Guide to guide
What's a great audio guide made of? What should I pay attention to? And what about the technical aspects? This "Guide to guide" is meant to give answers to all of these questions.
Before you start
First of all, you should think about what exactly you want to tell your listeners
and where your route should run along.
If you already do guided tours, you won't have any problems with that and you can jump to the next section.
But if you are new to creating guides, maybe the following tips can help:
- In the best case, you have a personal connection to the places you talk about. You tell your own experiences, in your own words. Of course it is helpful to acquire additional knowlegde and read up on facts to add substance to the stories. But the main point is to convey your personal standpoint, your opinion: Tell more than what can be found in every travel guide anyway.
- Choose the appropriate means of transport for the guide. Adjust the distances between stations to this.
- Choose positions for the stations from where your listeners have a good viewpoint on the scene or a good impression of your story you are telling. You could also talk about different places in the surrounding area that are related – a little deviation from the subject isn't always bad. Just make sure there is enough to say about each station, so that it is worth stopping and listening.
- The route between your stations can be defined as well. You can choose the route in such a way that your listeners pass buildings or places that you mention in your guide. You could also select the most interesting, convenient or quiet route.
- Before you start recording your stories, it might help to write down some keywords for each station. It is not necessary to write out every sentence in full: Actually, sounding natural while reading out a text can be a rather difficult task – unless you are a very good reader. Try to talk freely, in your own words. Don't worry about minor pronunciation flaws and corrections that may occur. They can even make the whole thing more authentic and entertaining.
- In order to talk naturally about a subject, it may also help to anticipate questions that your
listeners on site would ask you.
For instance, the recording could have the structure of an interview, in which a friend poses the questions and you answer them. You could still cut the questions out of the recording afterwards. Or just leave it as it is. For that matter: Why necessarily clinging to a strict question-answer pattern? Maybe an open dialogue is the most suitable method for you. - Don't fear your own voice. It's perfectly normal if your recorded voice sounds strange to you at first. It doesn't sound strange to others. Just try to speak in a clear, distinct way and otherwise: Be yourself. It will be fine.
Add a new tour
To create a new guide, you first have to register and log in, in case you haven't done that yet. Upload a profile image of yourself and write a bit about you, so your listeners get to know you better.
Click on your username on the top right, then on My Tours and there on Create new tour. Enter the tour's language, name, city and country. Choose the fitting category for your tour - the service fees depend on it. Tours that you sell on guidemate are exempt from service fees, as well as tours by individuals and schools. You can find all details under prices and conditions.
If you are in doubt concerning choosing the right category, choose "individual arrangement". We will contact you then and find a suitable arrangement for everybody.
General tour information
After you have created a new tour, you are in the Edit tab. There, you can change the settings that you entered in the creation screen. Moreover, you can define the following:
- Every tour needs a main image, so that users get a first impression of the tour quickly. Photos in landscape format are best - portrait photos will be displayed cropped in most views.
- In the description field, you should sum up the topics that you address in your guide. Moreover, you might attribute copyrights and give credit to people who are involved. If your guide is based on a real guided tour, of course you may refer to this. In the description, you can use text formatting such as bold text, headings and links. How that works is described below the text field in edit mode (click on the pencil above the description).
- Here are some hints concerning the price for paid tours:
On the one hand, there is the Apple price tier which is only relevant for the iPhone app. The price tiers are defined by Apple and can have different amounts for every country and tier. The amount displayed after the tier is the current amount in Euros for Germany. However, Apple can change the amounts at any time. That means it is only an approximate value. You will see the final value for each purchase in the half-yearly invoice.
The other price is for all other platforms (Android in-app purchases, PayPal or Digistore24 in the web version). On Android, prices are also converted to other currencies which can result in minor differences in the pay-out amount. For PayPal and Digistore24, the amount in Euros is used for all countries.
The settings for the Apple price tier are not immediately applied - it can last some days until a tour is available on the iPhone or until price tier changes are visible.
Create stations
After entering the general guide information, you can begin with the actual stations of your guide.
-
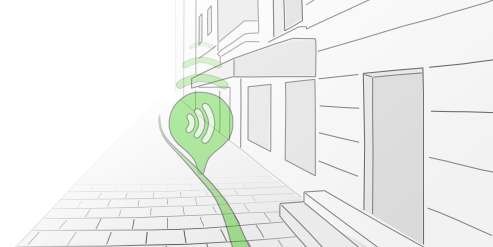
 To add a new station, click on the pin with the plus. You can find it in the tool bar at the top left corner
of the map. Now your cursor becomes the shape of an empty pin. Click on the map to place your station at the
right position. To cancel, click the button again or press ESC.
To add a new station, click on the pin with the plus. You can find it in the tool bar at the top left corner
of the map. Now your cursor becomes the shape of an empty pin. Click on the map to place your station at the
right position. To cancel, click the button again or press ESC.
- Enter a name for the new station. Try to keep the name short – otherwise it will be shortened in some locations.
- Now, you can change to the Edit tab again. There, you can edit more details of your newly created station:
- For each station, you can upload an image and write descriptive text. Images in quadratic or landscape format are the best choice. Text formatting is possible. In addition to the main image, more images with optional captions can be uploaded.
- The most important part of a station are the audio tracks. You can upload a previously recorded audio file in different formats. For mobile devices, a version with a higher compression level can be created. For chargeable audio guides, an additional short preview version is created that can be listened to without payment.
Add more stations and edit connections
![]() When you're adding more stations, keep in mind that a new station is always inserted
after the currently selected station.
However, you can change the sequence of stations at any time by clicking the
sorting icon in the toolbar on the map.
When you're adding more stations, keep in mind that a new station is always inserted
after the currently selected station.
However, you can change the sequence of stations at any time by clicking the
sorting icon in the toolbar on the map.
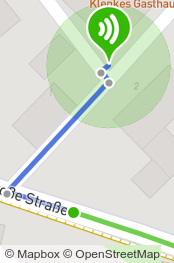 For the connection between two stations, a street connection is used by default.
The route depends on the means of transport, which you can select via the toolbar.
To be able to edit a connection, the respective connection has to be active, that is, shown as
a blue line. Click on the connection or on the station before the connection for activating.
On an active connection, you see the intermediate points as small circles.
You can drag those points to adjust the route, or remove them with right-click.
You can add new intermediate points by simply clicking on the connection line.
For the connection between two stations, a street connection is used by default.
The route depends on the means of transport, which you can select via the toolbar.
To be able to edit a connection, the respective connection has to be active, that is, shown as
a blue line. Click on the connection or on the station before the connection for activating.
On an active connection, you see the intermediate points as small circles.
You can drag those points to adjust the route, or remove them with right-click.
You can add new intermediate points by simply clicking on the connection line.
![]() By clicking direct connection (in the toolbar on the top left of the map), you can remove all
existing intermediate points from the currently active connection.
By clicking direct connection (in the toolbar on the top left of the map), you can remove all
existing intermediate points from the currently active connection.
![]() By clicking street connection (also in the toolbar), you can recalculate a
street connection. If you have already defined intermediate points manually, you can choose to include
them in the new route. This way, you can give a few hints where your route should run along and let
the rest be calculated automatically.
By clicking street connection (also in the toolbar), you can recalculate a
street connection. If you have already defined intermediate points manually, you can choose to include
them in the new route. This way, you can give a few hints where your route should run along and let
the rest be calculated automatically.
![]() By clicking do not connect stations (also in the tool bar on the map), you can define that stations
should not be connected at all. The user has to find their way on their own und you do not need to define connections.
By clicking do not connect stations (also in the tool bar on the map), you can define that stations
should not be connected at all. The user has to find their way on their own und you do not need to define connections.
This setting also determines that stations are played in any order in the auto play mode in the apps.
 By clicking on the icon with the green circle, you can define a specific radius for AutoPlay.
AutoPlay is an option in the apps. If it is activated, the next station will be automatically played when it is
approached. If the stations are connected, the stations' order is relevant, otherwise not.
You can define here, how close a user has to approach a specific station in order for playback to start.
The standard value is 20 meters, but, for example, for stations that can't be approached that near,
a larger value can be useful.
By clicking on the icon with the green circle, you can define a specific radius for AutoPlay.
AutoPlay is an option in the apps. If it is activated, the next station will be automatically played when it is
approached. If the stations are connected, the stations' order is relevant, otherwise not.
You can define here, how close a user has to approach a specific station in order for playback to start.
The standard value is 20 meters, but, for example, for stations that can't be approached that near,
a larger value can be useful.
Preview and check
For checking how your tour would look in the normal view on the website, click on the tab Preview. All changes are immediately visible there, you do not have to reload the page. The language selection on the top left also changes the language in the preview.
If you want to view the preview in a new browser tab, click on the button Full Version on the bottom right of the preview area.
However, this view does not automatically update. So you have to reload the page for changes to be visible.
The full version's URL is the one under which your tour will also be available after publishing. Before publishing, you can only
see the tour under this URL as long as you are logged in with your user.
Publish the tour
When you have finally finished your tour, you can make it visible for everyone by clicking on the pencil next to "not publicly visible" in the edit tab. You have to publish your tour for each language separately.
By default, a published tour will be shown on the guidemate homepage, can be found via the internal search function and
will also be indexed by search engines such as Google.
If you check the option Hide this tour in all listings upon publishing, then the tour is only available for everyone
that knows the exact URL, but it is not linked anywhere automatically. This can make sense if you want to make a tour available
to some internal testers before making it available for everyone, for example.
Create several language versions
You have the opportunity to create several language versions for the same tour.
In this case, the user initially sees the version which matches the device's language –
the other languages can be switched to as well.
To add a new language version, just click on pencil icon on the top right next to the current language and then
on "Add new language version".
Some things such as images, place and the tour's structure (stations, connections) are independent
of the language and are therefore shared among all language versions.
This means, a change in these things always affects all versions.
This does of course not apply for language dependent properties like description texts and audio tracks.
Moreover, publishing is done separately as well: It is possible that one version is already published,
while another one is not.
Test the tour
After you have finished your guide, it would be best to go the whole distance with your smartphone.
It is not necessary to publish the tour for this purpose. You can just use the web version on your smartphone while you are logged in.
It is also possible to make small changes on site then. Or you can test with the app. If you log in with your user, you will also see
unpublished tours in the section "My guides".
While you're at it, pay attention to the right placing of the stations.
Check if the routes between each station are correct and convenient. You'll see if
the whole tour or the distance between stations maybe is too long.
If the weather is right, you can also take photos for each station along the way –
in case you don't have them already.